
To fix a grainy photo on an iPhone, use editing apps like Snapseed or Lightroom Mobile. Adjust exposure, sharpness, and noise reduction.
Capturing moments with your iPhone can result in grainy photos, often due to poor lighting or high ISO settings. Thankfully, fixing this issue is easy with the right editing tools. Using popular apps like Snapseed or Lightroom Mobile, you can adjust various settings such as exposure, sharpness, and noise reduction to enhance the quality of your photos.
In this guide, we’ll explore effective techniques to help you transform your grainy iPhone photos into clear, crisp images that you’ll be proud to share.

Credit: www.perfectcorp.com
Understanding The Issue
Identifying The Problem
Grainy photos on your iPhone can be frustrating, causing your images to lose sharpness and clarity.
Causes Of Grainy Photos
Uncovering what leads to grainy photos can help in finding the right solution.

Credit: letsenhance.io
Preventive Measures
To fix a grainy photo on iPhone, apply preventive measures like ensuring proper lighting, keeping the lens clean, and using the built-in editing tools. Adjusting the exposure and employing third-party editing apps can also improve photo quality.
To ensure your iPhone photos turn out crisp and clear, follow these preventive measures.Optimizing Camera Settings
Properly adjust camera settings for each photo you take.Choosing Proper Lighting
Select ideal lighting conditions to minimize grainy effects in your photos.Simple Fixes
Enhance the quality of your grainy iPhone photos with simple editing techniques. Adjusting brightness, sharpness, and using photo editing apps can greatly improve the clarity of your images. Experiment with these quick fixes to achieve professional-looking results on-the-go.
If you’ve taken a photo on your iPhone and it’s come out grainy, don’t worry! There are a few simple fixes you can try to improve the quality of your image. The built-in editing tools on your iPhone can be surprisingly powerful, allowing you to enhance and refine your photos without needing to download any additional apps. Here’s how to utilize these tools to fix a grainy photo.Adjusting Exposure And Contrast
One of the first things you can do to improve a grainy photo is to adjust the exposure and contrast settings. Head to the Photos app, select the photo you want to improve, and tap “Edit” in the top right corner. From there, you can use the sliders to adjust the exposure and contrast levels.Noise Reduction
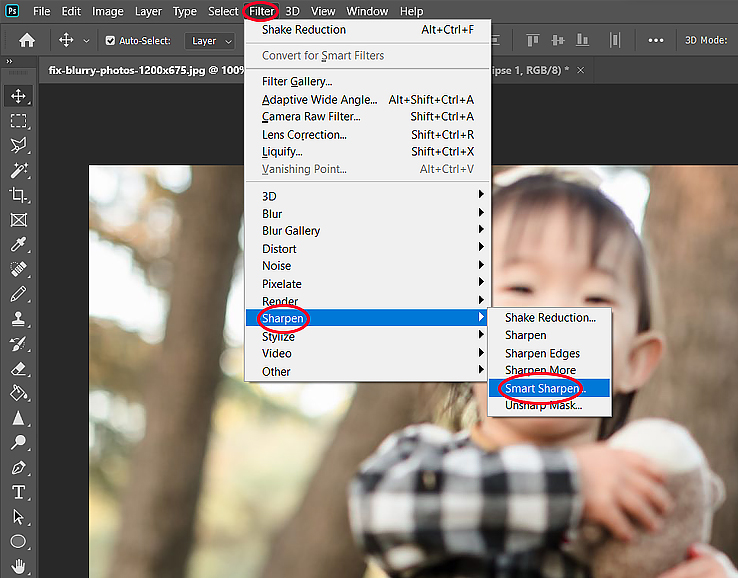
Another helpful tool for reducing graininess in your photos is the Noise Reduction feature. Within the editing tools, tap on the three overlapping circles icon, then select “Noise Reduction.” Use the slider to reduce the grainy noise in your photo and help it appear smoother and clearer. If the built-in editing tools on your iPhone aren’t providing the level of improvement you’re looking for, it may be time to explore third-party editing apps. These apps often offer a wider range of features and options to help you perfect your photos, including advanced noise reduction algorithms and additional controls for adjusting sharpness and clarity.Top Third-party Apps
Some popular third-party editing apps for improving photo quality include:- Adobe Lightroom
- VSCO
- Snapseed
- Afterlight
Advanced Techniques
While basic adjustments can improve the quality of grainy photos on your iPhone, there are times when you need to dive deeper for more precise results. In these cases, utilizing advanced techniques can make a significant difference. This section will explore two advanced strategies to enhance your grainy photos on iPhone: Manual Adjustments with Editing Apps and Noise Reduction Software.
Manual Adjustments With Editing Apps
If you aim for complete control over the editing process, manual adjustments with editing apps should be your go-to solution. These powerful tools allow you to fine-tune various aspects of your photo to minimize and eliminate unwanted graininess.
Noise Reduction Software
When manual adjustments are not enough, noise reduction software comes to the rescue. These specialized programs analyze the image and apply advanced algorithms to reduce noise while preserving important details and maintaining overall image quality.
When choosing a noise reduction software, it’s essential to consider compatibility with your iPhone and the simplicity of the software’s interface. Aim for a user-friendly solution that aligns with your skill level and expertise.
Implementing these advanced techniques can significantly improve your grainy photos and elevate their overall quality. Remember to experiment with different settings, as each photo may require unique adjustments. With dedication and practice, you’ll achieve stunning results and transform grainy photos into visually captivating masterpieces.
Professional Assistance
If all your attempts to fix a grainy photo on your iPhone have been unsuccessful, it may be time to seek professional assistance. There are two main avenues to explore: seeking help from photo editing services or consulting professional photographers. Let’s delve into each option to determine the best course of action for your grainy iPhone photos.
Seeking Help From Photo Editing Services
If you want a quick and convenient solution to fix grainy photos, consider reaching out to professional photo editing services. These services employ skilled photo retouchers who have expertise in enhancing image quality. They possess the necessary tools and knowledge to transform your grainy iPhone photos into sharp, high-quality images. To find reputable photo editing services, you can conduct a simple online search or ask for recommendations from fellow photographers or friends who have previously used such services.
Before engaging a photo editing service, it’s essential to ensure they have a good track record and offer a high level of customer satisfaction. Take the time to browse through their portfolio and read customer reviews. This step will give you an idea of their capabilities and help you choose a service that aligns with your needs.
Consulting Professional Photographers
If you want personalized assistance to fix grainy photos while honing your photography skills, consulting a professional photographer can be the ideal approach. These experts possess a wealth of knowledge and experience in capturing and enhancing images. They can provide valuable insights on improving shooting techniques, utilizing advanced editing software, and mitigating graininess in your iPhone photos.
When choosing a professional photographer, look for someone who specializes in the specific area you’re seeking help with, such as mobile photography or post-processing. This way, you can ensure they have the relevant expertise to tackle the grainy photo issue specifically related to your iPhone.
Keep in mind that consulting a professional photographer may involve a higher cost compared to photo editing services. Nevertheless, the personalized attention and guidance they provide can be immensely beneficial for your overall photography skills and knowledge.
Credit: letsenhance.io
Frequently Asked Questions On How To Fix A Grainy Photo On Iphone
How Do You Get Rid Of Grainy Pictures On Iphone?
To get rid of grainy pictures on iPhone, ensure good lighting, use the Grid feature for composition, avoid digital zoom, clean the camera lens, and try using third-party camera apps.
How Do You Make A Grainy Picture Clear?
To make a grainy picture clear, use photo editing software to adjust the brightness, contrast, and sharpness. You can also use noise reduction tools to minimize graininess. Additionally, try using a higher resolution or retake the photo in better lighting conditions for a clearer image.
How Do I Fix The Quality Of A Picture On My Iphone?
To improve the quality of a picture on your iPhone, try these steps: 1. Ensure your camera lens is clean and free of smudges. 2. Take photos in well-lit areas or use the iPhone’s built-in flash if needed. 3. Use the HDR (High Dynamic Range) feature for better exposure and detail.
4. Avoid excessive zooming, as it can result in blurry images. 5. Experiment with editing apps to enhance brightness, contrast, and sharpness.
How Do I Fix My Grainy Camera On My Phone?
To fix a grainy camera on your phone, try cleaning the lens with a soft cloth, adjusting the focus manually, or updating your phone’s software. Restarting the device or resetting camera settings may also help. If the issue persists, contact customer support for further assistance.
Conclusion
Fixing a grainy photo on your iPhone is possible with the right adjustments and techniques. By utilizing the various tips and tricks outlined in this blog post, you can significantly improve the quality of your photos. Remember to experiment and practice with different settings to achieve the best results.
Embrace the power of technology at your fingertips!