
To connect an iPhone to a server, go to Settings, tap on Wi-Fi, select the network, and enter the necessary credentials. Are you an iPhone user looking to connect your device to a server?
Connecting your iPhone to a server can provide access to important files and resources. We will guide you through the process of connecting your iPhone to a server in a few simple steps. By following these instructions, you will be able to establish a connection and access the server from your iPhone effortlessly.
So, let’s get started and make your iPhone-server connection seamless.

Credit: m.youtube.com
Essential Steps For Connecting Your Iphone To A Server
Essential steps for connecting your iPhone to a server require a few key actions to ensure a seamless connection. Following these steps will help you establish a reliable connection to your server, enabling smooth access to files, media, and other resources.
Before connecting your iPhone to a server, ensure that your network connection is stable. Check for a strong Wi-Fi or data connection to avoid interruptions during the connection process.
Next, configure the server settings on your iPhone by accessing the Settings app. Under the Accounts section, tap on Add Account to set up a new server connection. Enter the necessary server details, including the server address, username, and password.
Checking Network Connection
When it comes to connecting your iPhone to a server, the first step is checking your network connection. This is a crucial step as it ensures that your device is properly connected to the network, whether it is through Wi-Fi or cellular data. In this article, we will guide you through the process of checking your network connection, including ensuring Wi-Fi or data connection and verifying signal strength.
Ensuring Wi-fi Or Data Connection
To connect your iPhone to a server, you need to have a stable internet connection. Start by checking if your Wi-Fi is turned on. Simply go to the settings on your iPhone and tap on Wi-Fi. Make sure it is enabled and that your device is connected to an available network. If you prefer to use cellular data, you can also enable it by going to the settings and selecting Cellular. This will ensure that you have a reliable connection when accessing the server.
Verifying Signal Strength
Alongside ensuring that you have a connection, it is important to verify the signal strength of your network. This will help in determining the stability and speed of your connection. To check the signal strength on your iPhone, you can look at the status bar located at the top of your screen. The number of bars displayed indicates the strength of your signal, with more bars indicating a stronger connection. If you notice that the signal strength is low, try moving closer to your Wi-Fi router or consider switching to a different network to improve your connection.
Configuring Server Settings
Locating Server Information
To connect your iPhone to a server, you first need to locate the necessary server information. This includes the server address, username, and password. The server address may vary depending on the type of server you are connecting to. If you are unsure about the server information, you can reach out to your IT department or the server administrator for assistance.
Entering Server Details On Iphone
Once you have gathered the required server information, you can proceed with entering it on your iPhone. Here’s how to do it:
- Open the “Settings” app on your iPhone.
- Scroll down and tap on “Passwords & Accounts”.
- Select “Add Account” and choose the email provider that matches your server type (e.g., Exchange, IMAP, POP).
- Enter your email address and password, then tap “Next”.
If the server settings are not automatically detected, you will be prompted to enter them manually. To do this:
- Choose the type of account you are setting up (e.g., Mail, Contacts, Calendars).
- Under the “Incoming Mail Server” or “Outgoing Mail Server” section, enter the required server details. This typically includes the server address, username, and password.
- Tap “Next” or “Save” to complete the setup process.
It is important to ensure that you enter the correct server details to establish a successful connection between your iPhone and the server.
Testing The Connection
Testing the connection is an essential step to ensure the stability and reliability of the connection between your iPhone and the server. Through testing, you can verify that the connection is established correctly and that you can access the required resources seamlessly. Here’s how to test the connection to ensure everything is working as it should.
Accessing Server Resources
Once the connection is established, you can start accessing the various resources available on the server. This includes files, folders, and applications that are pertinent to your needs. By ensuring a steady and smooth connection, you can carry out these tasks efficiently.
Troubleshooting Connection Issues
If you encounter any issues during the testing phase, it’s important to have troubleshooting steps in place to address them promptly. This might involve checking the network settings, verifying the server address, or ensuring that the correct credentials are being used. By promptly addressing any connection issues, you can ensure a reliable and stable connection to the server.
Tips And Best Practices
Learn how to easily connect your iPhone to a server with these helpful tips and best practices. Ensure a seamless connection by following step-by-step instructions and troubleshooting potential issues along the way. Stay connected and access your data effortlessly with these practical insights.
Regular Server Maintenance
Perform regular server maintenance to ensure smooth connectivity.
Using Secure Connections
Secure your connections to protect sensitive data.
Regular server maintenance is crucial for a stable connection.
- Check for updates and patches frequently.
- Monitor server performance and troubleshoot issues promptly.
- Backup data regularly to prevent loss in case of a failure.
Ensure using secure connections to safeguard your information.
- Utilize VPN services for secure remote access.
- Encrypt data transmission to prevent unauthorized access.
- Implement strong passwords and two-factor authentication.
Stay proactive in maintaining and securing your server for optimal iPhone connectivity.
Credit: techelper.io
Credit: discussions.apple.com
Frequently Asked Questions On How To Connect Iphone To Server?
How Do I Fix My Iphone Not Connecting To The Server?
To fix iPhone not connecting to the server, check your network connection, restart the iPhone, update software, and reset network settings. It’s also helpful to check server status and ensure no firewall is blocking the connection. If the issue persists, contact Apple support for assistance.
How Do I Access My Apple Server?
To access your Apple server, follow these simple steps: 1. Open the Finder app on your Mac. 2. Go to the “Go” menu at the top and select “Connect to Server. ” 3. In the server address field, type in the IP address or domain name of your Apple server.
4. Click “Connect” and enter your login credentials when prompted. 5. You should now have access to your Apple server and its files. Enjoy!
Can You Use An Iphone As A Server?
Yes, you can use an iPhone as a server. IPhones have the capability to run server software and handle server-like functions. So, if you need to serve files, host websites, or share data, an iPhone can be used as a server.
How Do I Connect My Iphone To Smb Server?
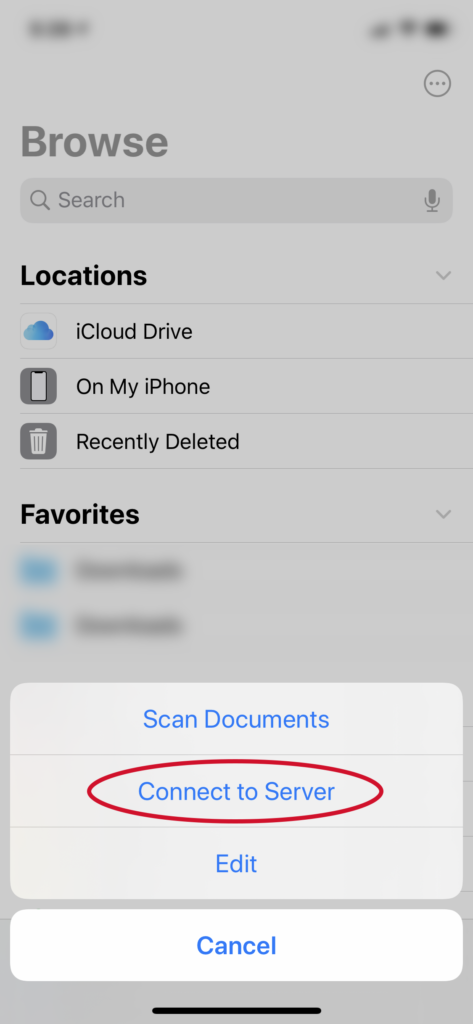
To connect your iPhone to an SMB server, go to the Files app, tap the three dots in the top right corner, select “Connect to Server”, enter the server address, and tap “Connect”. Enter your username and password, and tap “Next” to access the files on the SMB server.
Conclusion
Connecting your iPhone to a server is crucial for accessing files on the go. By following the simple steps outlined in this guide, you can easily establish a secure connection to your server and access your data anytime, anywhere. Stay connected and productive with your iPhone and server integration.