
To fix grainy photos on your iPhone, adjust the exposure, use image editing apps, and clean the camera lens. Grainy photos on the iPhone can be fixed by making simple adjustments to the camera settings and utilizing photo editing apps.
Whether you are dealing with low-light conditions or a dirty lens, these solutions can help you improve the quality of your iPhone photos. By understanding how to effectively address grainy images on your iPhone, you can enhance your photography skills and capture clearer, more visually appealing photos.
Let’s explore some practical tips and techniques to fix grainy photos on your iPhone and achieve better results in your photography endeavors.
Credit: letsenhance.io
The Science Of Grainy Photos
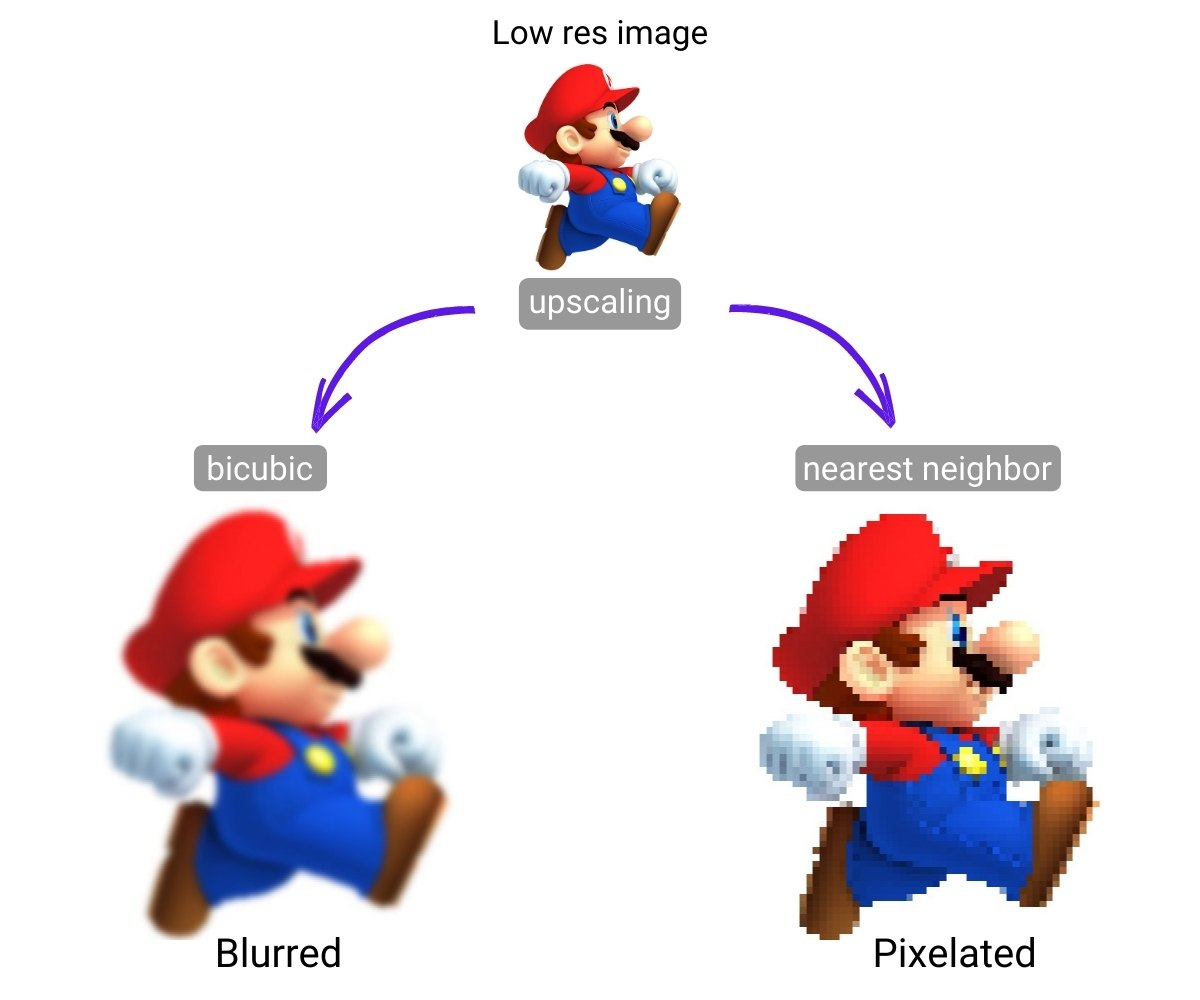
Understanding Pixelation
Pixelation occurs when the individual pixels that make up an image become visible, resulting in a grainy and distorted appearance. This occurs when the image is enlarged beyond its original resolution, causing the pixels to become more pronounced.
Understanding pixelation is essential in addressing grainy photos, as it allows you to comprehend the root cause of the issue and apply appropriate solutions.
Impact Of Lighting
The quality of lighting can significantly impact the clarity of your photos. In low-light conditions, the iPhone camera tends to compensate by increasing the level of digital noise, leading to grainy images.
Applying appropriate lighting techniques or utilizing the iPhone’s flash feature can help mitigate this issue and improve the overall quality of your photos.

Credit: letsenhance.io
Mastering Iphone Camera Settings
Mastering iPhone Camera Settings can greatly improve the quality of your photos. Understanding and adjusting the camera settings such as exposure, ISO, and shutter speed can help you capture clearer and less grainy images. In this guide, we’ll delve into the essential iPhone camera settings that can help optimize the quality of your photos.
Optimizing Exposure
Optimizing exposure is crucial for capturing clear and vibrant photos. To do this, tap on the area of your photo that you wish to be the main focus. If the subject appears too dark or too bright, use the yellow sun icon next to the focus square to adjust the exposure level. Slide the sun icon up to brighten the image or down to darken it, until you achieve the desired exposure.
Adjusting Iso And Shutter Speed
Adjusting ISO and shutter speed can significantly reduce the graininess of your photos. Keep your ISO setting as low as possible to minimize the grain. This can be achieved by tapping on the ISO number, then dragging your finger to the left to decrease it. Additionally, adjusting the shutter speed can help to reduce noise and produce sharper images. To do this, swipe left or right next to the shutter speed indicator to adjust it accordingly.
Utilizing Third-party Apps
Easily enhance the quality of grainy photos taken on iPhone by utilizing third-party photo editing apps available for download. These apps offer a range of features to refine and sharpen images, providing a simple solution to improve the overall clarity of your pictures.
Introduction To Editing Apps
When it comes to fixing grainy photos on your iPhone, utilizing third-party apps can be a game-changer. These apps offer a range of powerful tools to enhance image clarity and bring out the details in your photos.
Enhancing Image Clarity
One of the key features of third-party editing apps is their ability to enhance image clarity. By utilizing tools like sharpening filters and noise reduction algorithms, these apps can help reduce graininess and improve the overall sharpness of your photos.
Moreover, third-party apps often have advanced settings that allow you to adjust the exposure, contrast, and color balance of your photos, further enhancing their clarity and quality.
Techniques For Better Photography
Whether you are a professional or an amateur photographer, improving your photography skills is always a worthwhile endeavor. By implementing a few simple techniques, you can quickly elevate the quality of your photos. In this blog post, we will explore some essential techniques that will help you take better pictures with your iPhone.
Stabilizing Techniques
One of the most common reasons for grainy photos is camera shake. To minimize this issue, it is crucial to stabilize your iPhone while capturing photos. Here are a few techniques you can use:
- Hold your iPhone with both hands to provide better stability.
- Rest your elbows on a stable surface, such as a table or wall, to steady your hands.
- Invest in a tripod or a smartphone stabilizer for even greater stability.
By effectively stabilizing your iPhone, you can significantly reduce blurry photos caused by camera shake, resulting in clearer and sharper images.
Utilizing Natural Light
Lighting plays a crucial role in photography, and natural light can often produce stunning results. Here are some tips for making the most of natural light:
- Avoid using the iPhone’s built-in flash, as it can create harsh shadows and wash out the details in your photos.
- When shooting outdoors, take advantage of the golden hours – the hour after sunrise and the hour before sunset – when the sunlight is softer and creates a warm, flattering glow.
- Position your subject facing the light source so that it is evenly illuminated.
- If shooting indoors, position your subject near windows to allow natural light to fill the frame.
Utilizing natural light can greatly enhance the quality of your photos, bringing out the natural colors and details in your subjects.
Preserving Image Quality
Learn how to enhance image quality and fix grainy photos on iPhone with simple steps. Preserve the original clarity and sharpness of your images using these quick and effective techniques. Improve your photo quality and avoid graininess for stunning mobile photography.
Preserving Image Quality Taking grainy photos on your iPhone can be frustrating, especially when you want to capture crisp and clear memories. Fortunately, there are steps you can take to fix grainy photos and improve the overall image quality. In this section, we will explore two important factors that play a crucial role in preserving image quality: backup strategies and avoiding over-editing.Backup Strategies
 Protecting your photos from loss or damage is essential. By employing effective backup strategies, you can ensure the preservation of your precious memories. Here are a few strategies to consider:
- Create regular backups: Backing up your photos regularly is crucial in case of any unexpected accidents or hardware failures. Utilize cloud storage services like iCloud or Google Photos to automatically backup your photos.
- External storage devices: Invest in external storage devices like an external hard drive or USB flash drive to keep an additional copy of your photos offline.
- Duplicate copies: Make duplicate copies of your important photos and store them in multiple locations to minimize the risk of losing them permanently.
Avoiding Over-editing
 While editing can enhance the visual appeal of your photos, it is important to exercise caution and avoid over-editing, which can lead to grainy images. Here are some tips to help you strike the right balance:
- Don’t overdo exposure adjustments: Adjusting the exposure can help brighten or darken your image, but excessive manipulation can introduce noise and grain. Make subtle adjustments to retain the natural look.
- Use noise reduction tools wisely: Noise reduction tools can be helpful, but excessive use can result in loss of detail and softening of the image. Use them selectively to reduce graininess without sacrificing the overall quality.
- Keep a tab on sharpness: Increasing sharpness can make details stand out, but too much sharpening can introduce artifacts and make your image appear grainy. Find the right balance to maintain image quality.

Credit: www.amazon.com
Frequently Asked Questions Of How To Fix Grainy Photos On Iphone
How Do I Get Rid Of Grainy Photos On My Iphone?
To get rid of grainy photos on your iPhone, ensure good lighting, use the built-in noise reduction feature, and avoid zooming in too much. You can also use third-party apps or edit the photo’s brightness and contrast to improve the quality.
How Do You Fix A Grainy Picture?
To fix a grainy picture, use a photo editing software to adjust sharpness and reduce noise. Increase contrast and brightness if needed.
How Do I Fix The Quality Of A Picture On My Iphone?
To improve a picture’s quality on your iPhone, try these steps: 1. Ensure good lighting conditions. 2. Avoid using digital zoom. 3. Clean the camera lens. 4. Use the HDR mode for better contrast. 5. Use photo editing apps to enhance sharpness, brightness, and color balance.
Why Do My Iphone Photos Look Grainy When Printed?
IPhone photos can appear grainy when printed due to the small sensor size in iPhones, which can result in less light being captured. Additionally, low lighting conditions or high ISO settings can also contribute to graininess. It’s recommended to use proper lighting and avoid high ISO settings for better print quality.
Conclusion
Enhance your iPhone photography by following these simple grain-fixing tips. Say goodbye to grainy photos with our easy solutions. Let your iPhone camera capture crisp and clear images effortlessly. Improve your photography skills and wow your friends with crystal-clear pictures.
Embrace these techniques to elevate your photo game!